 |
| Requirements |
Bunny
Scissor Fob Instructions

Now - the problem here is I can't upload the pattern which is a pdf. Please leave me a comment with your email address and I will send you the pattern. I will see if my son can sort this out. (watch this space)
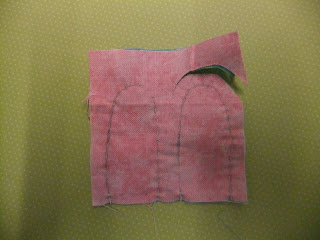
- Cut out 2 x head pieces on cutting line.

- Draw round the sewing line onto the back of one piece of main colour fabric with a pencil.
- On the other piece - sew X for nose and sew on beads / buttons / felt for eyes on main colour fabric.

- Put one pink and one main colour piece right sides together Draw on sewing line with pencil - you will get both ears out of 2½ inch square. (cut out after stitching)

- Stitch with small running stitches - leave the bottom open. Snip curves of seam allowance (take care not to cut your stitches) and using a pencil (with an eraser on the end is easier) turn right side out. Finger press.
- Take piece with eyes and nose on put facing up on table, fold ribbon in half and pin at centre of head with fold pointing down. Position ears with pink side facing eyes and nose and short edge to top of head - pin. Put other piece of main colour fabric right side towards ears and ribbon. Pin all round. Sew around stitching line with small back stitches - leave open at the bottom where marked. Do extra stitches to hold ribbon firmly. Keep thread and needle attached


- Snip curves and finger press opening then turn right sides out

- Stuff firmly and ladder stitch opening
- Attach bunny to your scissors - Enjoy!


by
Davina Adams www.cottonconfetti.co.uk
Angel
Policy
Please
make as many as you like for gifts or charity, but none for personal
profit.

1 comment:
good day today this is the link for the birdie http://www.spoolsewing.com/blog/2008/05/16/bird-mobile/
have a good trip linda
thought i had got your e-mail :(((
Post a Comment